Nøkken is a supernatural being
that lives in small inland waters and is a shapeshifter. It tries to
trick people into drowning, often by changing shape into a horse, which
when mounted would charge into a lake and take you to the bottom with
it. I've never liked water, and a certain illustration by Theodor
Kittelsen came to mind when I saw the LEDs glowing.
Mark I
23rd August 2010
This project started about 8 months ago in January 2010, when I saw
that a
surprising number of people were making ROVs at home. Though very few
had footage of anything interesting, it certainly proved the concept
was viable. I've always been fascinated and fearful of the ocean, so
this seemed a great way to explore the depths without having to
personally go where
the sun doesn't shine.I began researching, finding websites,
designs which looked clever, and parts which would be suitable.
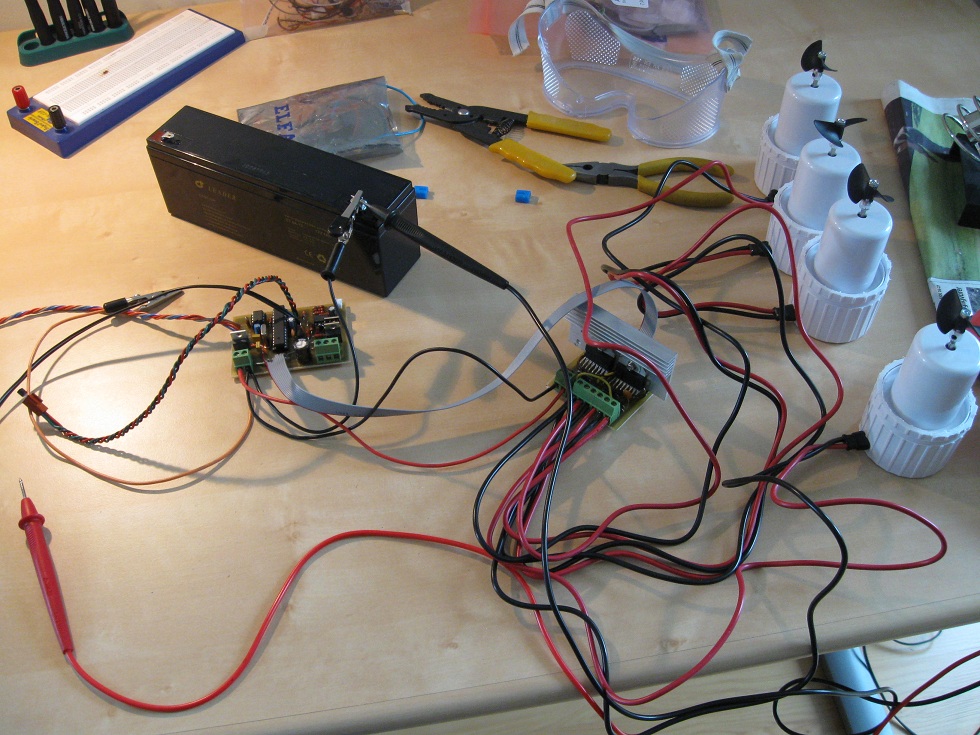
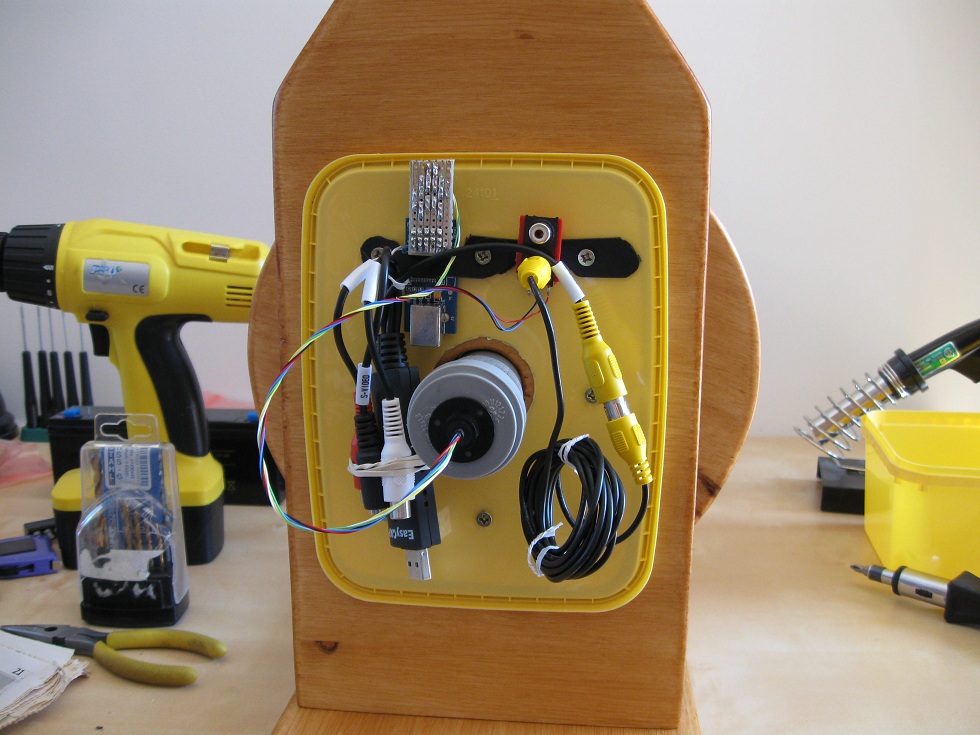
About a month passed, and I began programming the control board and PC
interface. This consisted of an ATmega8 in the ROV and a VisualBasic
program on the PC end. The end result was a control board with camera
feed, PWM light control, forward/reverse of three motors, battery level
monitor, temperature sensor and a leak detector. All communications to
the surface are sent through a 4-wire cable (cat-5 paralleled at each
end) and received by any PC with two USB ports and appropriate drivers.
Camera feed is received using a 20$ EasyCap USB device, while the
serial commands to the ATmega8 are sent over RS-485 thanks to an FTDI
USB chip. Since both the camera and serial signals are USB compatible,
any PC worth it's salt can be used to control the ROV.
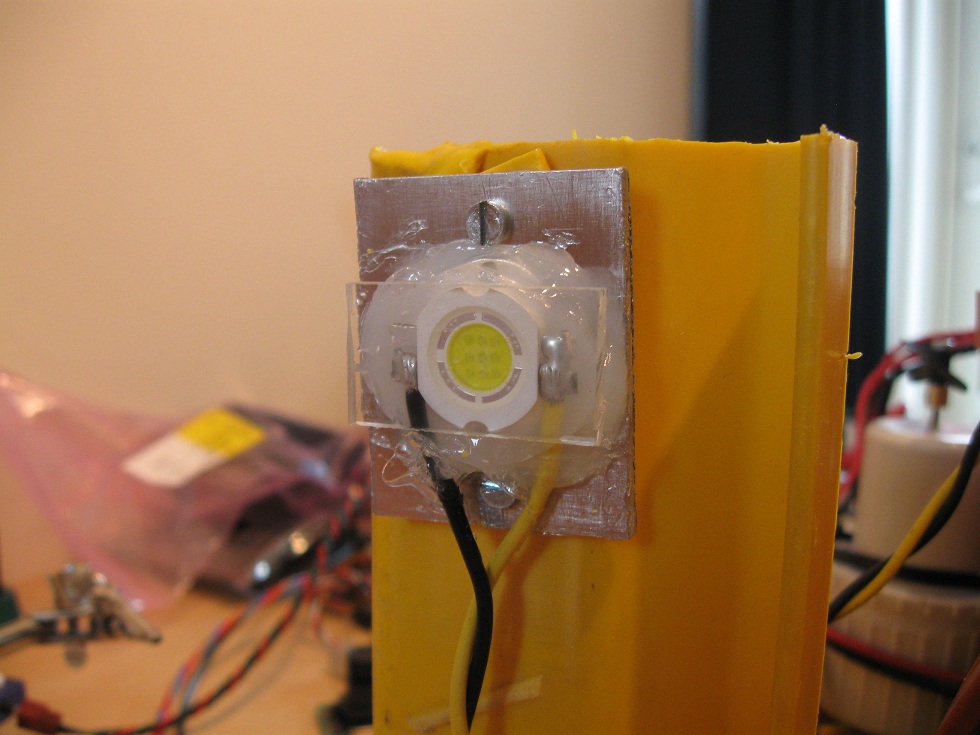
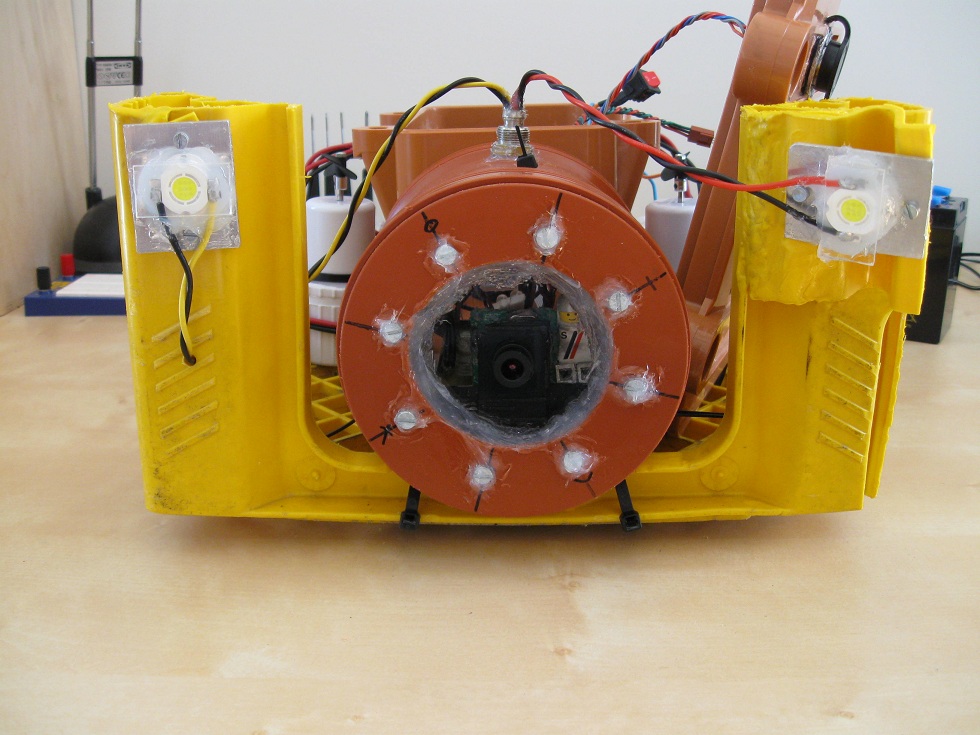
Camera feed is provided by a small PCB type composite video camera,
just 30$
at Sparkfun. It's excellent at adjusting to various light levels, and
works best in near darkness, which suits the ROV well. Lighting is
provided by two 10W LEDs, though I will probably only need to run them
at 20% duty, where they seem to give more than enough light for the
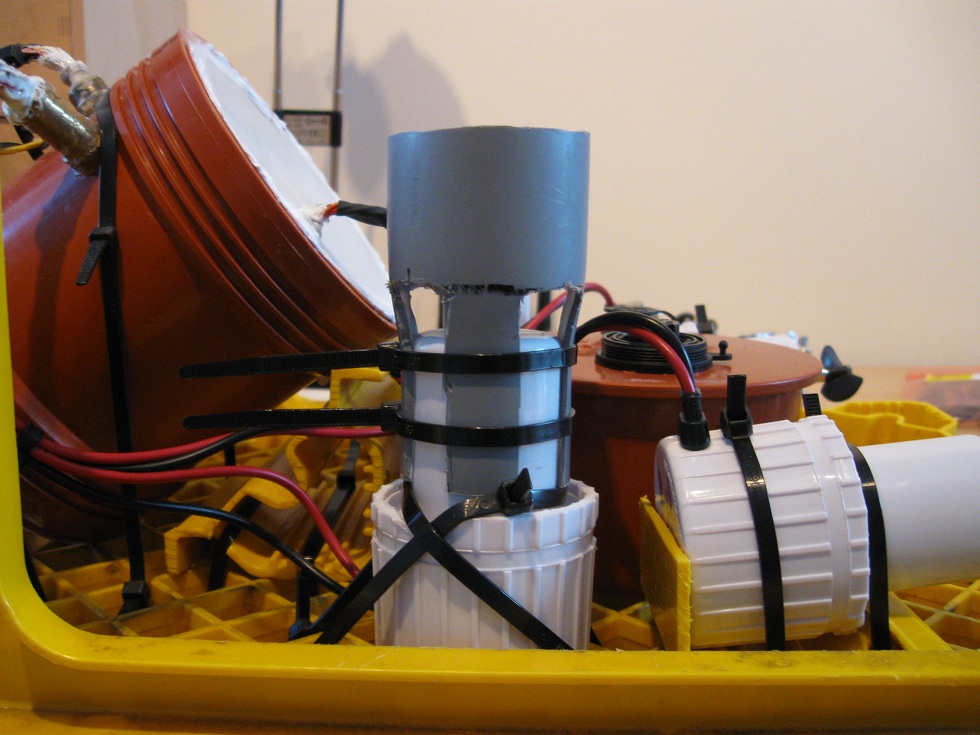
camera. The circuit boards were put in tubs and submerged in hot wax,
rendering
them pretty much water tight in the event of a leak. The camera PCB was
simply covered in RTV silicone, so it can withstand splashes at least.
Most of the project time was spent creating this interface, despite it
not seeming like a big job initially. The end result was worth it
however, giving me a nice, reliable, solid state controller. Power for
the whole assembly is supplied by an 8Ah 12V SLA battery, on
board the ROV.
Schematics, PCB files, source code, firmware and PC software can be
downloaded here.
(Updated 14.04.11)
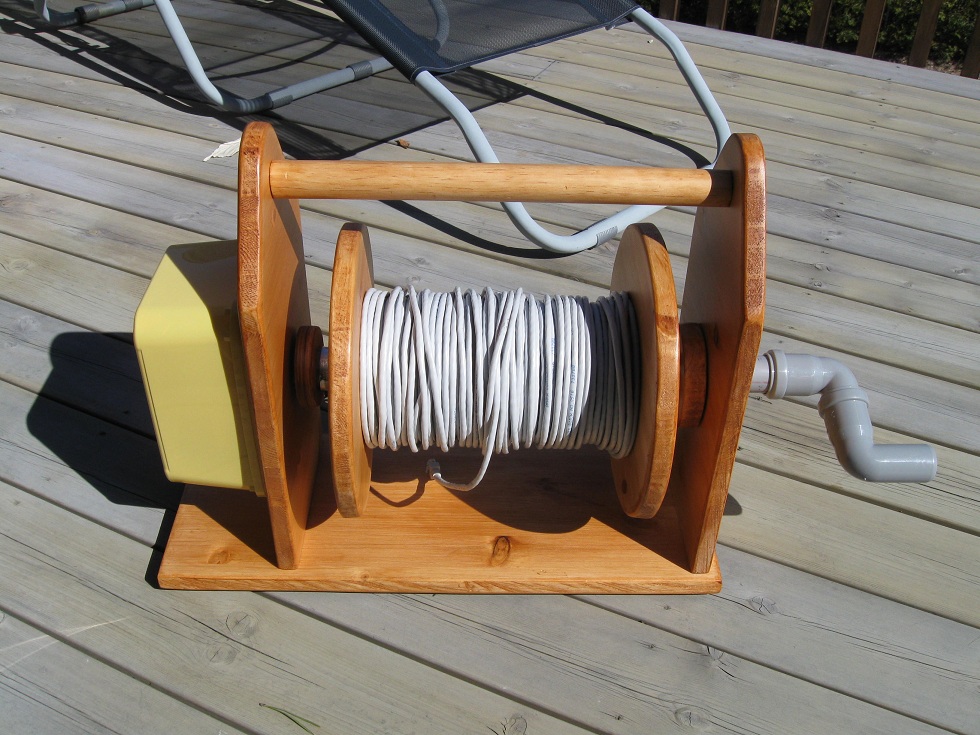
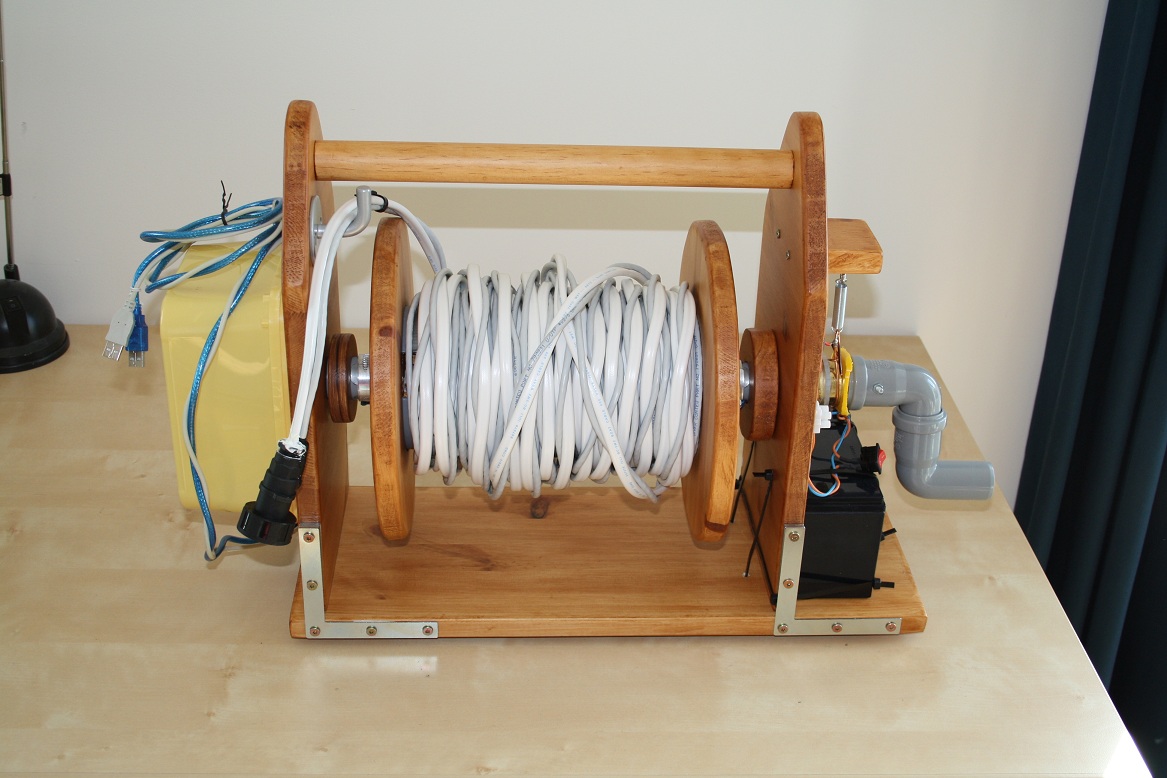
I had seen the "HomebuiltROVs" guy had made a slip-ring reel for his
tether, and I thought something like that would be vastly more
practical than throwing cable overboard and reeling it again by hand.
Having waterskiied for some summers now, I knew that this would only
result in headaches when it came time to untangle the mess, especially
if the ROV couldn't be disconnected from the tether. A decent amount of
woodworking went into the tether reel, and with two coats of varnish it
should hold up to salt water splashes. The slip ring is a professional
unit purchased on ebay, well worth the money. The electronics housing
is simply an ice-cream container. Thrust is provided by four 360gph
bilge pumps. I've modified them to use propellers, using some modified
RC components (also from ebay). The connector used between the tether
and ROV was some kind of marine connector purchased on ebay, from
China. I wouldn't recommend it, as it leaks even at shallow depths. It
did hold up long enough to test the ROV however.
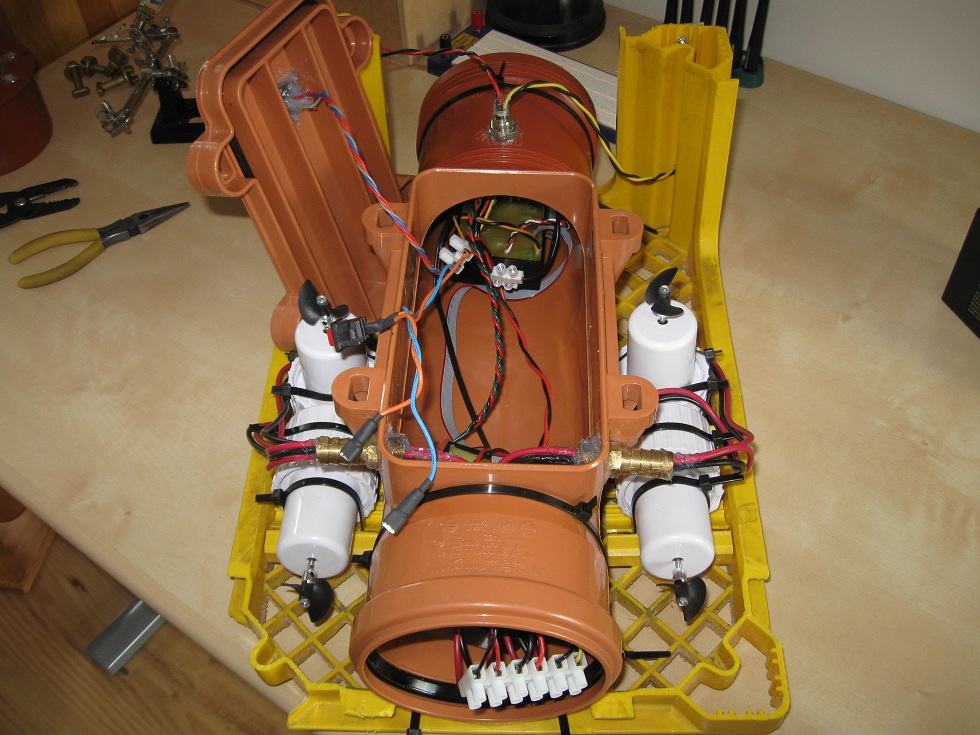
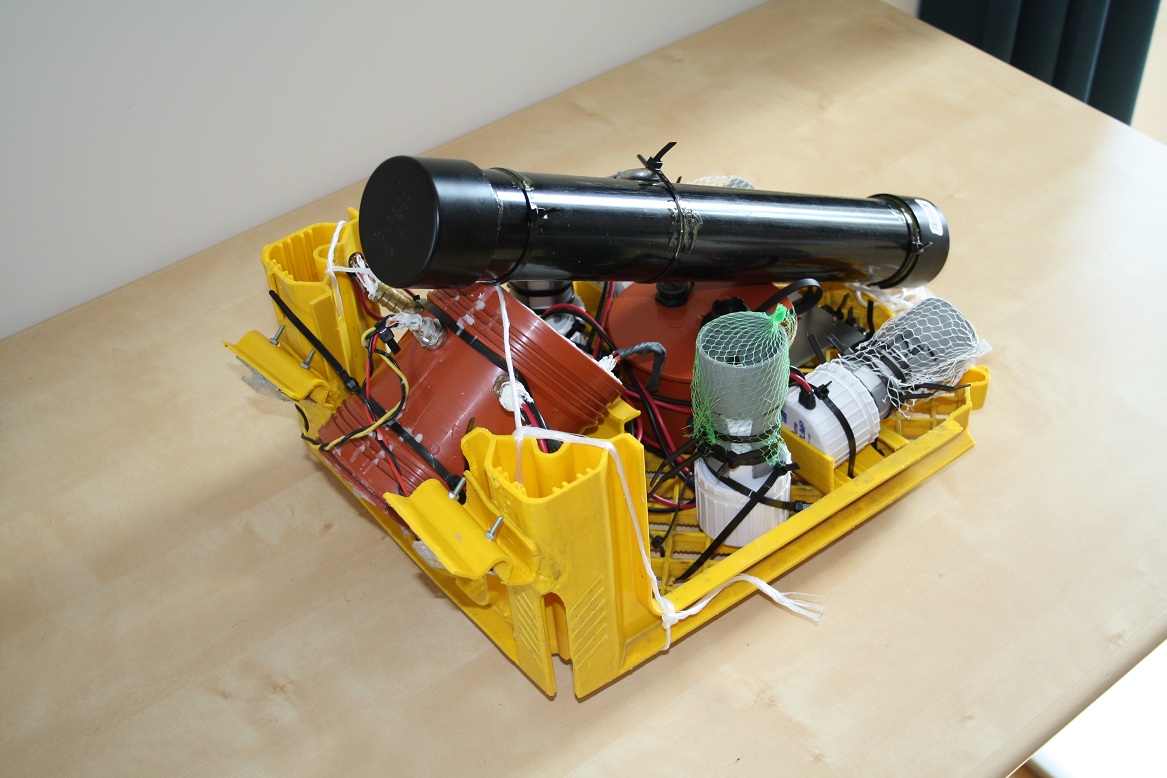
The ROV itself was slapped together quickly compared to the rest of the
project, takingonly a few weeks. Basically it consists of a
plastic
pop-bottle crate, some drainage pipe and the duct-tape of the sea - zip
ties. Some sawing, a little dremel work on the pop crate to make room
for the pipe, some fine dremel work on the left-overs to make
motor supports and the frame was done. Everything was zip-tied in
place, which both fastens and allows for removal later. I was never
able to make the ROV entirely watertight, and as the main
chamber filled with water the ROV would begin to tip backwards. To
counter this, I sealed an ABS pipe full of air and suspended the ROV
beneath it, while placing weights on the bottom of the ROV. This keeps
it stable even as the hull takes on water. Buoyancy and stability are
important aspects of ROV design, and need to be taken into
consideration. Otherwise your ROV might sink to the bottom, or simply
point straight up like mine did before the fix!
Now, closer to the present I was actually able to take the ROV out for
a dive in the ocean. Before this I had tested it in the bathtub a few
times, and twice in a nearby lake. Neither provided any interesting to
see, so I hoped things would be different in some clear ocean water.
All in all, the ROV was out for about 30 minutes, but because of the
camera angle (straight forward), there is only a few minutes of
interesting footage. None the less, it's enough to make me eager to
improve the ROV further, and hopefully take it much deeper. In the
video below the ROV was driving near the surface down to about 3 meters
at the most.
Parts and expenses
All told, this project set me back roughly 500 USD. To help anyone looking
at making something similar I've listed some of the components I used
and their cost at the time. Some can be found cheaper now, or better
components are available for the same price. So be sure to investigate
this for yourself! In addition to the components listed below, you'll
need bilge pumps, several discrete electronics components, and of
course some stuff from the local hardware store.
From Ebay, I purchased the following:
EasyCap RCA~USB 2.0 Video Capture/In, VCR/VHS~DVD maker
31,59 USD
2x 10W Power White LED Light Bulb 700lm 120 degree
24,00 USD
KYM06 Slip Ring (6 wires, 2 amps)
43,00 USD
4x Plastic Propeller Props, 3.18mm*35mm
8,93 AUD
5x Plane CNC Motor Shaft Prop Adapter 2mm to 3mm
2,99USD
USB to RS232 Module Based TTL PC FT232R FT232 FT232RL
19,98USD
USB Type A cable for FTDI
1.62USD
USB extension cable
2.99USD
Sparkfun:
Temperature sensor, DS18B20
4,25USD
RCA Color Camera CMOS
Camera Module - 640x480
31,95USD
2x Full-Bridge Motor Driver Dual
5,90USD
2x Breakout Board for RJ45
3,90USD
2x RJ45 8-Pin Connector
3,00USD
Aftermath:
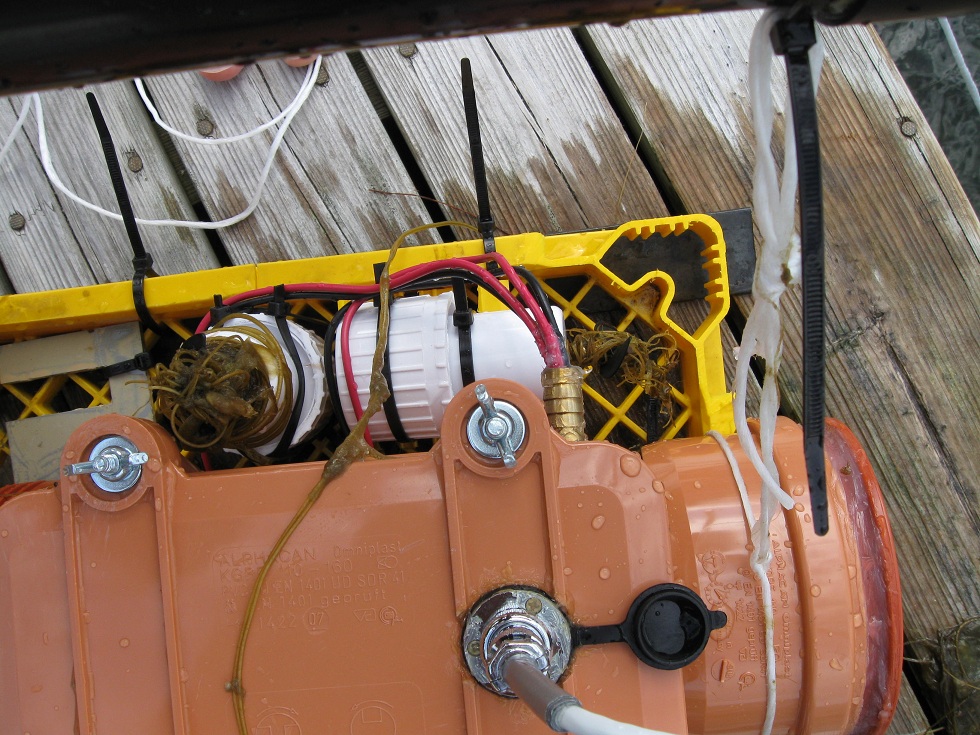
Even at the relatively shallow depths I had taken the ROV down to, a
few centimeters of water had already collected in the hull. Upon
disassembly of the ROV and inspection of
the hull later, I've found a hairline fracture running lengthwise along
the bottom of the pipe. This proves the PVC drainage pipe is
definitely not pressure rated, and far too brittle for this
application. The major problems so far have been
water leaking into the hull, water leaking into the tether connector,
seaweed jamming the propellers, and the tether itself sinking. The
poorly chosen camera angle was a real bummer too. A note to anyone who
none the less wants to use an unsealed hull solution, any water vapour
trapped in your ROV will quickly fog up the interior. If your camera is
too far away from the plexiglass face moisture will build up in front
of the camera, ruining your camera's focus. Quite often I would bring
the ROV up only to find the entire face had fogged over, except for a
small hole where the camera was positioned. This is largely because the
camera was spaced only a few millimeters from the plexiglass. Another
problem I noticed was that the wax used to seal the motor driver
actually melted and ran off. This left parts of the motor driver
exposed to saltwater, which would have corroded it to pieces had I not
discovered it when I did.
Mark II
Based on my experiences with the ROV this summer I plan to upgrade the
ROV. It's already been disassembled, and with any luck I may be able to try
it again before fall.
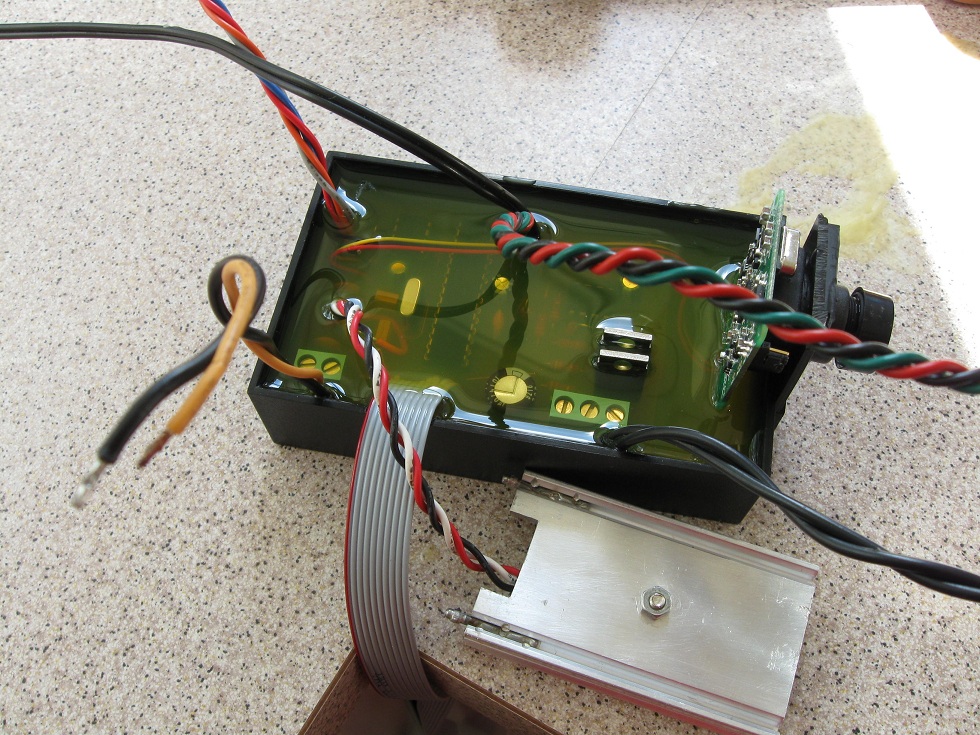
The plan is to seal all of the electronics, camera and wire connections
in wax, that way leaving no empty space for water to leak into. I'm
also looking at some IP68 rated connectors for the tether so it stops
leaking and shorting out the control signals. I'm not sure whether I
should leave the battery on board or not at the moment, but I'm quite
tempted to leave it on land. By not having it on board the ROV I would
remove the need for an openable, watertight container, which would
vastly simplify waterproofing. On the other hand, I would need a new
tether assembly, and heavy currents flowing beside the camera feed
might introduce too much noise.
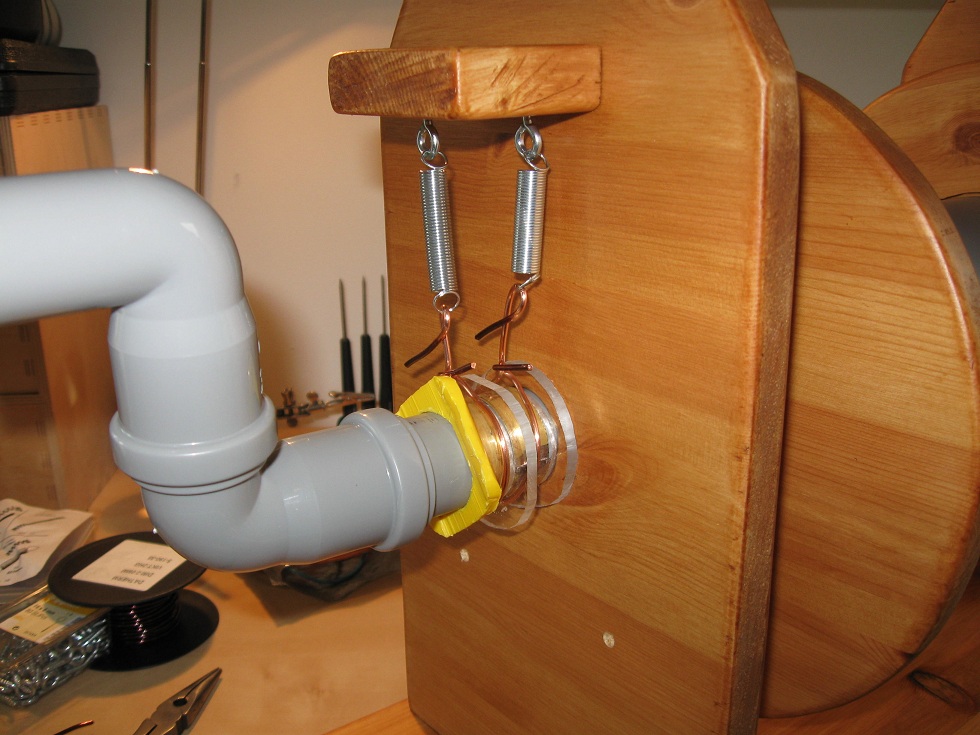
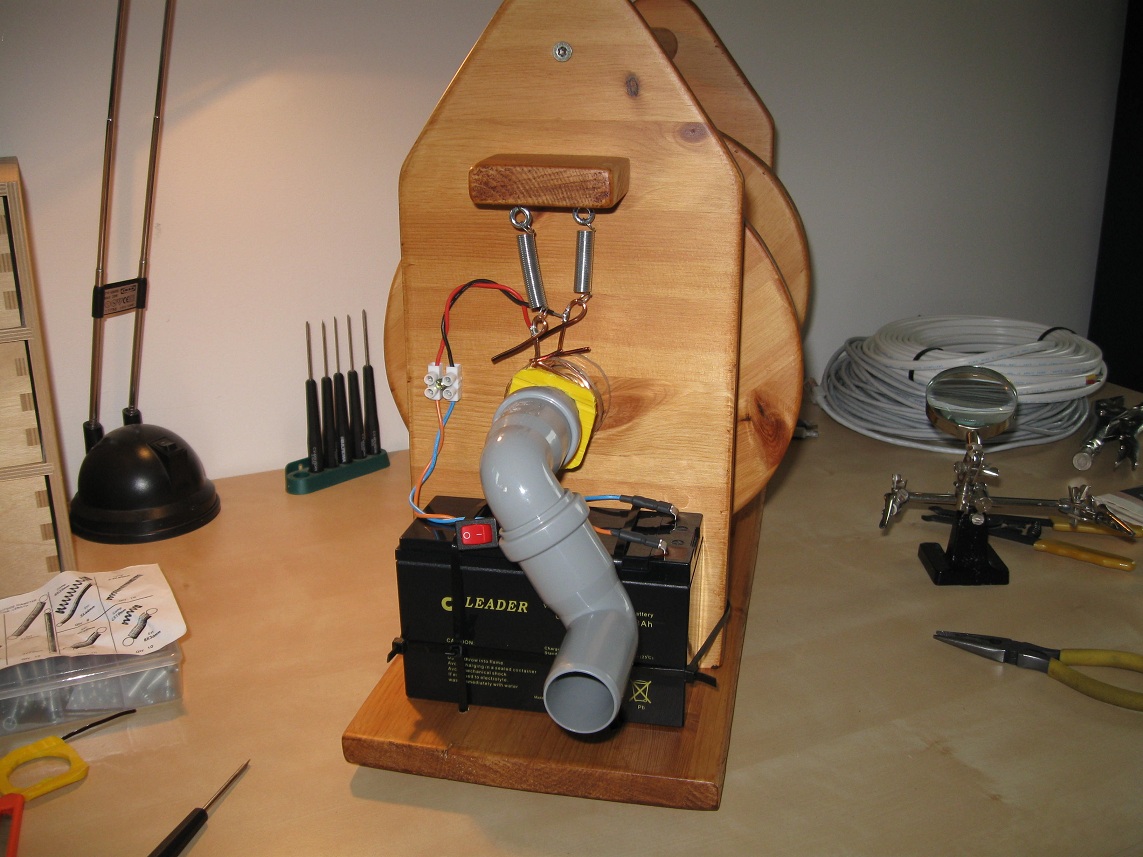
Update 15. Jan 2011
I did a bunch of work on the ROV during the fall, but needed some new
parts which essentially stalled the project. Since the last update,
I've decided to leave the batteryon land, and run power
through a
long 14AWG marine rated cable. Load tests have shown a voltage drop of
1,60V when running all motors and LEDs on 100% duty, which is
acceptable. To accommodate the new tether setup, I decided to modify
the existing tether reel rather than make a new one. The base was spun
around 180 degrees, giving me just enough room to mount the battery.
The hand crank was spaced far enough from the reel to allow me to
install a slip ring, which this time I had to make myself. What I did
was pull the main power wires through the pipe and place some plastic
spacers between them. Once the wires were out and spacers placed, I
soldered some brass strips to the wires. These strips were then wrapped
around the pipe until tight, and finally soldered so they remained in
place. That was not an easy job. Between the wire connection on the
bottom, and the solder used to hold the strips together, they didn't
turn out very round. Still, they are round enough to be used. With the
wires brought out of the pipe, assembling brushes to make contact with
them wasn't too difficult. Some enameled copper wire was simpled
stripped and wrapped around the pipe, and fastened with springs to the
reel.
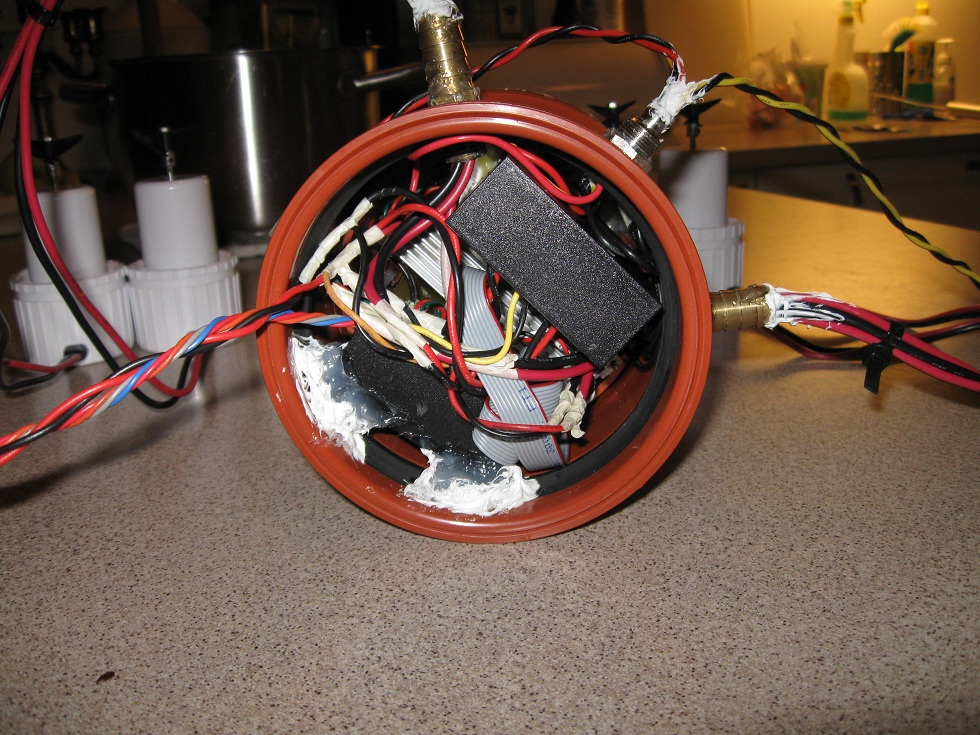
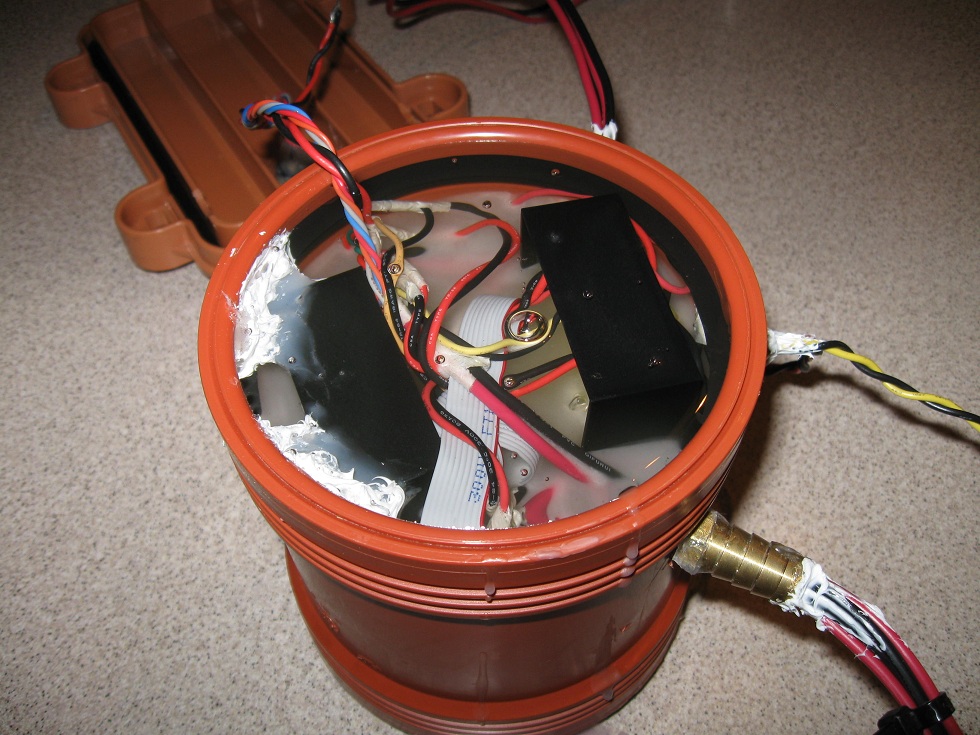
With the new power source secured, I could reduce the size of the ROV. Since
the ROV wouldn't need to be opened again anymore, I crammed all of the
electronics into what used to be the camera/control electronics
housing. The temperature probe was epoxied to the motor driver
heatsink, so I know if it's melting wax again. Once everything was
stuffed (literally, it was a damn tight fit) I tested to make sure none
of the connections had failed. With all checks good, I could proceed to
potting the entire assembly in wax. It took four large candles to fill
the compartment.
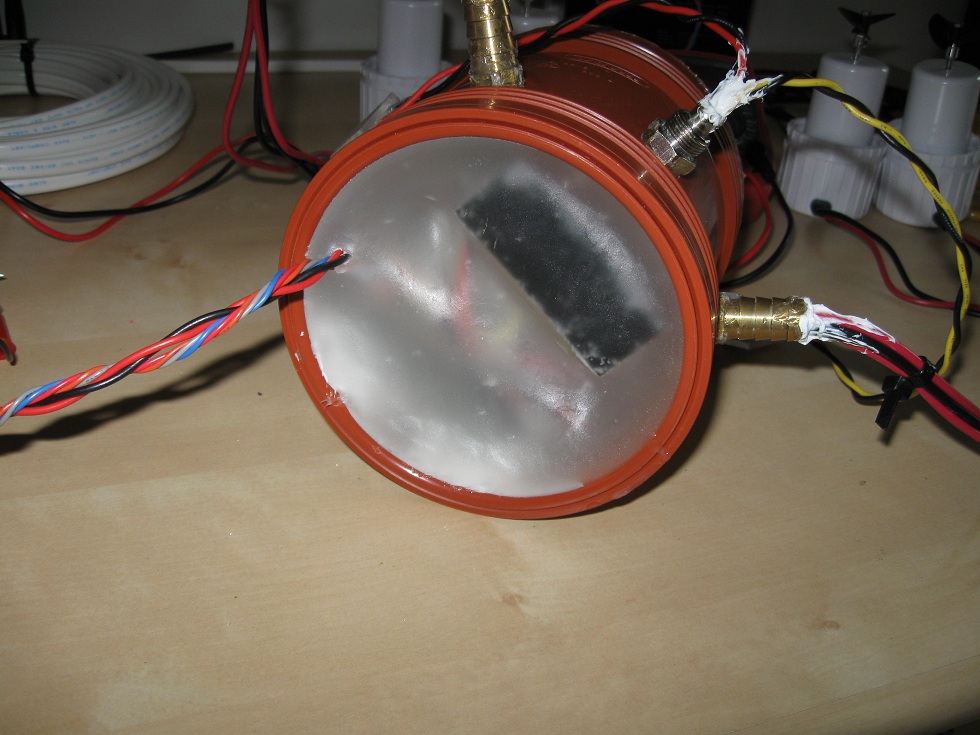
As you can see the new ROV could be built very small, but at the expense
of stability. I decided to use the same body as before, the old pop
crate, and simply adjust the weight/floats according to the new layout.
Taking wisdom from the last ROV, I mounted the camera so it would
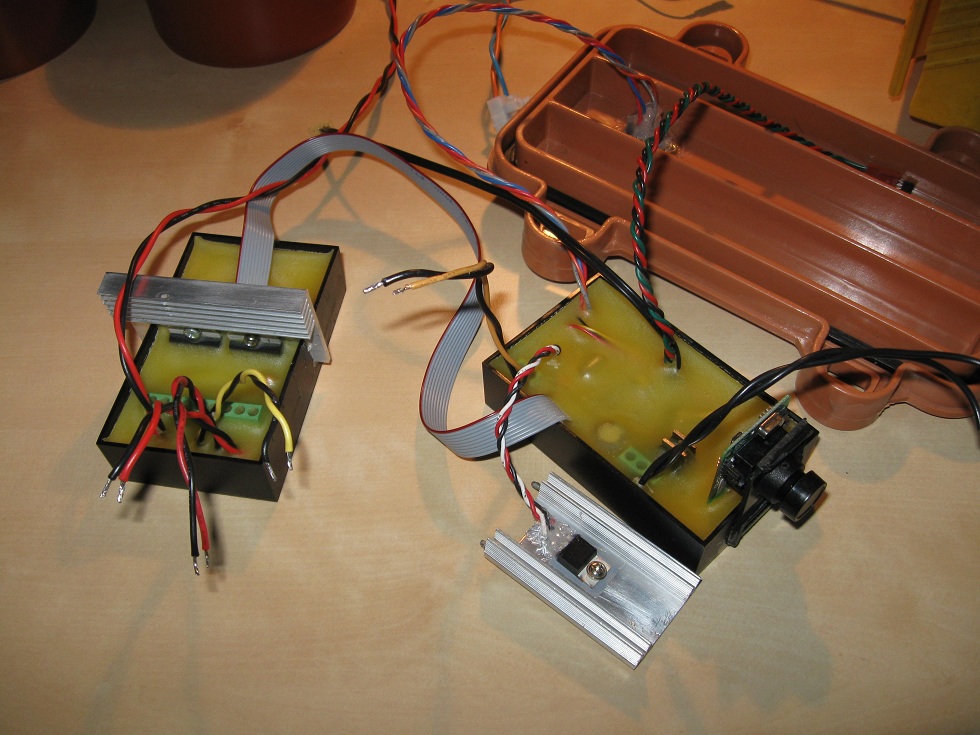
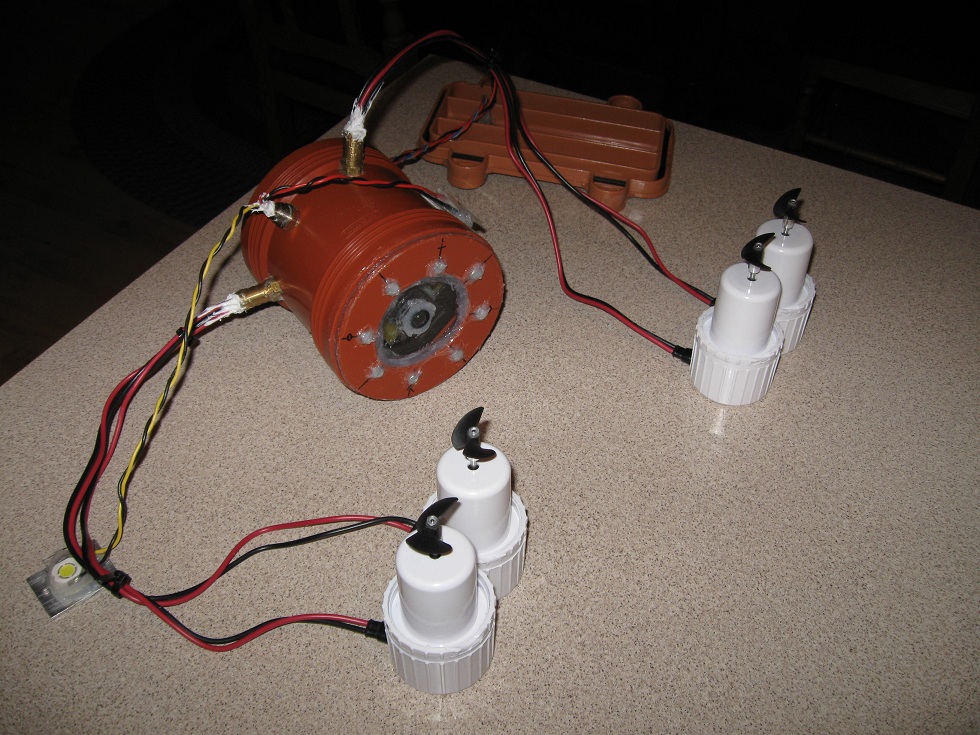
actually see something without having to rest on the bottom. Update 25.03.11
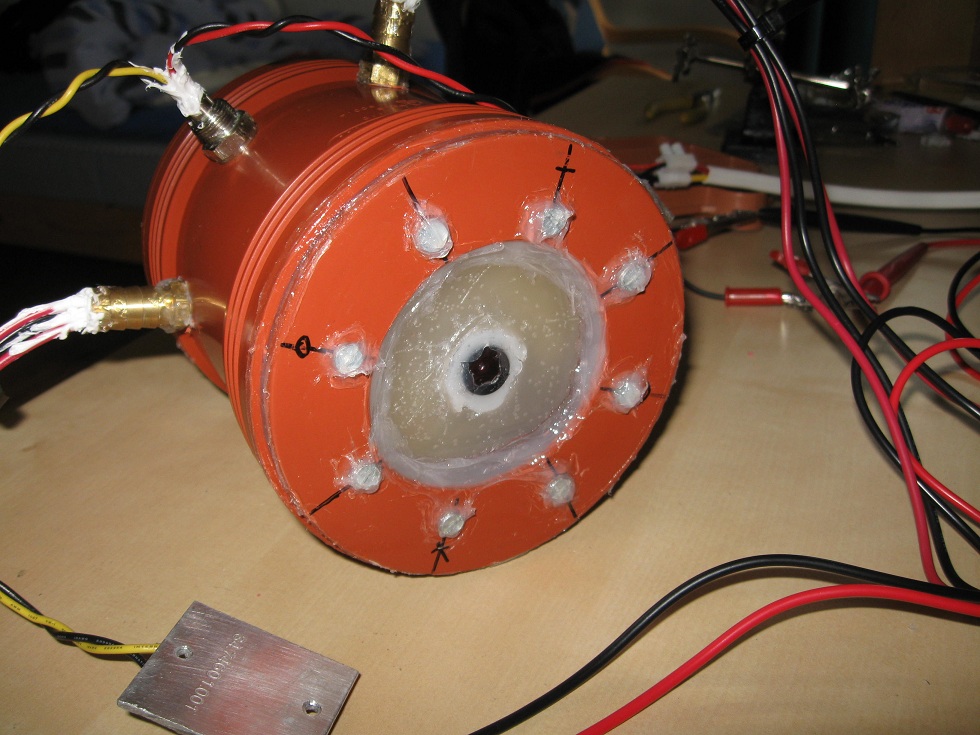
I've made some propeller shrouds from 5cm diameter polypropylene pipe,
and mounted the new waterproof contacts. The main power connector is a
2-pin Standard Buccaneer from Bulgin, and the data connector is from
Switchcraft. Next up I have to get some plastic mesh to keep seaweed
out of the propellers, and then work on getting the buoyancy of the ROV
just right. After that it should be ready for test run, once the lake
here thaws.
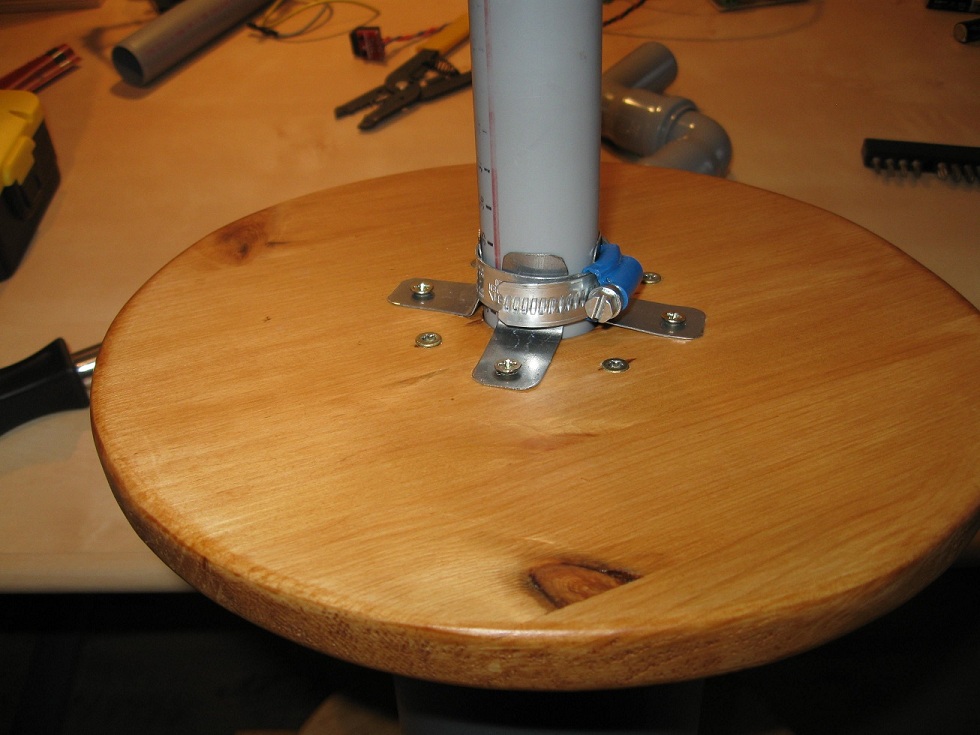
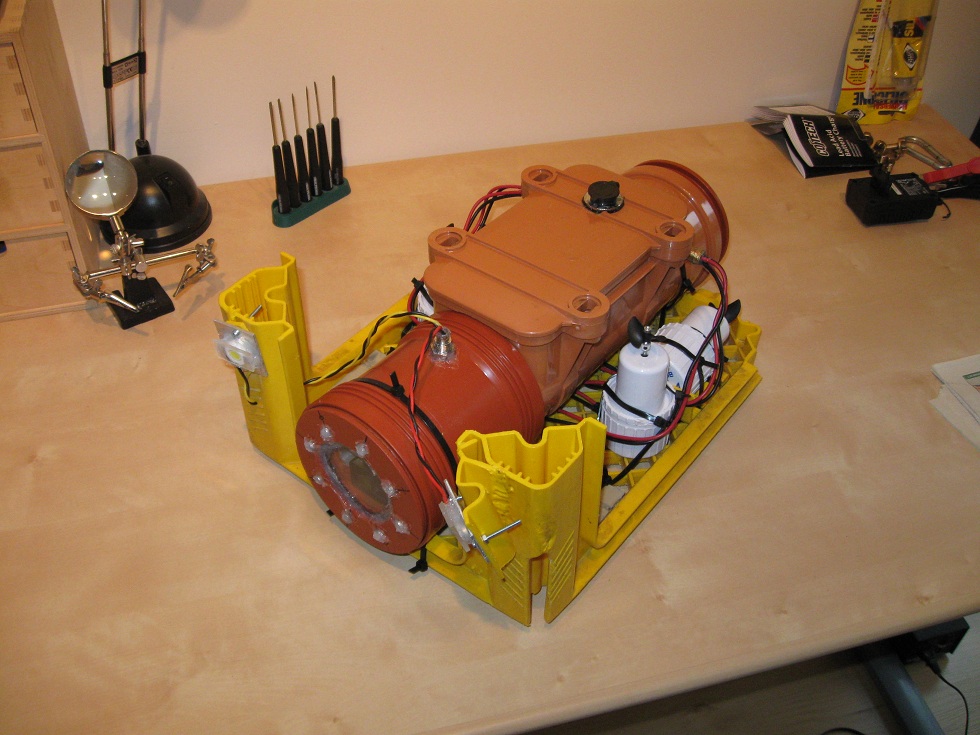
Update 14.04.11
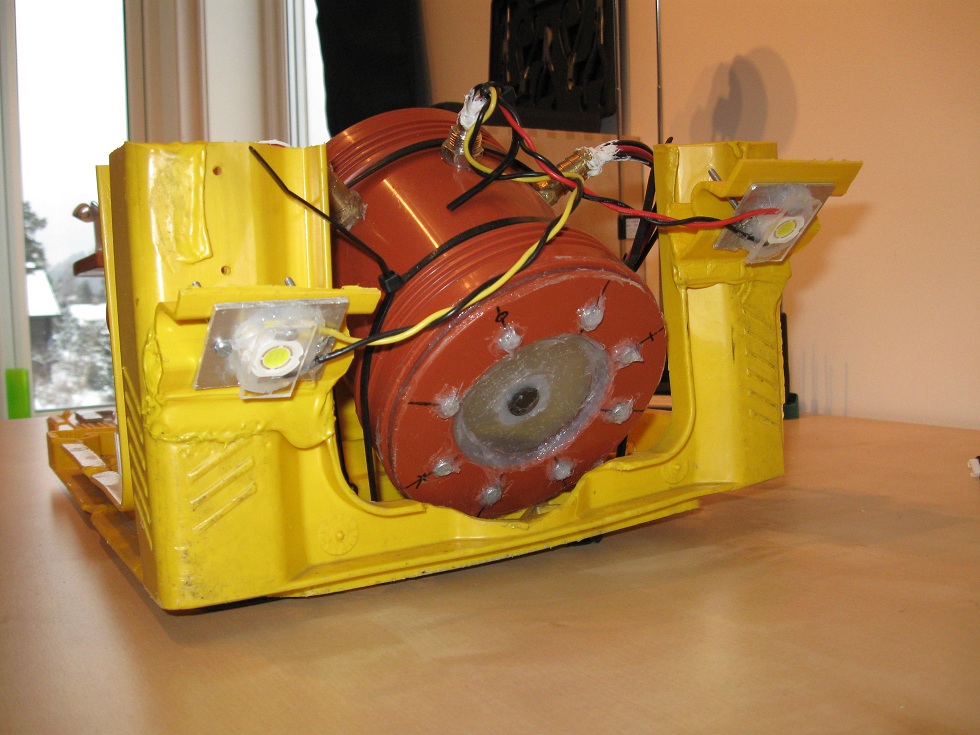
The mark II upgrade has now reached the point where it's ready for a test
run. In the image above you can see that I've mounted the same ABS
float used in the Mark I ROV. Some iron scrap was required to ballast
the ROV, but not as much as previously. With less ballast, and no
battery on board the ROV is considerably lighter. Hopefully not so
light that the heavier tether becomes an issue. While testing the ROV
in my bathtub, I discovered all the motors had been reversed some time
during reassembly. To fix this, I've upgraded the control center
software for windows. You can now invert the steering, forward/reverse
and ascend/descend, or both at once. COM ports can now be typed in as
well, allowing port numbers higher than 20 to be used. The
communications protocol used is the same as before, so the new software
can be used with the old ROV board (which hasn't been changed).
Update 30 July 2012
Testing was preformed with Nøkken MKII last summer, but I wasn't able to
document it until now. When actually attempting to use the ROV,
communication would always time out, and the video feed would cut in
and out (mostly out). It seemed the communications line had a break
somewhere. With no control of the ROV thrusters, limited video and no
means of field repair, I decided to sink it to the bottom and bring it
back up again. If nothing else, it would provide some insight on how
well the waterproofing worked. Despite the poor video connection some
interesting video was recorded, which was enough to keep my interest in
the ROV going. This summer (one year later) I decided to dismantle the
ROV and see what went wrong. It turned out small fissures had devloped
in the hardened wax, which allowed water to seep along the wires and
into vital circuitry causing corrosion of the circuit boards. Some of
the corrosion likely originated from the very first iteration of the
ROV, where wax was also used to seal the circuit boards. Somehow a
large air pocket had also developed while the wax was cooling, and this
was partially filled with seawater even one year later. Strangly enough
the corrosion alone didn't seem to be the real cause of the ROV
failing. Instead the 5V regulator (which was foolishly soldered to
wires and put on an external heatsink) had one loose wire, which would
have disabled both the control circuitry and camera! Regrettably I
didn't try the circuitry to see if it was still functional, but I did
remove the ATmega8 and MAX485 ICs, both of which functioned. Later
testing while building Nøkken MK 3 revealed an unforeseeable event,
which would have made communication impossible even if the electronics
hadn't failed. The program used to control the ROV relies on the .NET
framework, which Microsoft released an update for. The "update" causes
the serial port to misbehave, so when attempting to send information
and then using RTS to go into read mode, the serial port instead goes
to read mode before sending the data. This means the PC would request
sensor data and go into read mode, however the ROV would never receive
the message and also stay in receive mode! Needless to say the update
meant the control software and possible ROV firmware had to be
rewritten.
Disclaimer:
I do not take responsibility for any injury, death, hurt ego, or other
forms of personal damage which may result from recreating these
experiments. Projects are merely presented as a source of inspiration,
and should only be conducted by responsible individuals, or under the
supervision of responsible individuals. It is your own life, so proceed
at your own risk! All projects are for noncommercial use only.


 This work is licensed under a
Creative Commons Attribution-Noncommercial-Share Alike 3.0 Unported License.
This work is licensed under a
Creative Commons Attribution-Noncommercial-Share Alike 3.0 Unported License.