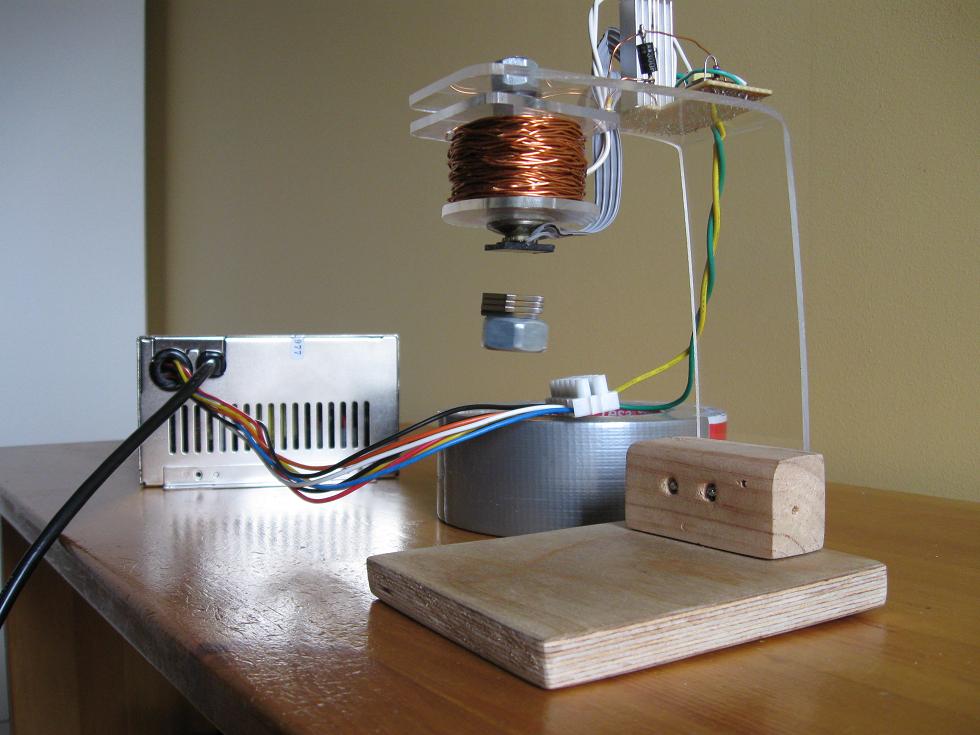
This is a simple magnetic levitator
which suspends objects a set distance below an electromagnet. The
physics behind it is to simply provide a magnetic force which equal and
opposite to the gravitational force on the object. The two forces
cancel and the object remains suspended. Practically this is done by a
circuit which reduces electromagnet force when an object gets to close, and increases it
when the object is out of range.
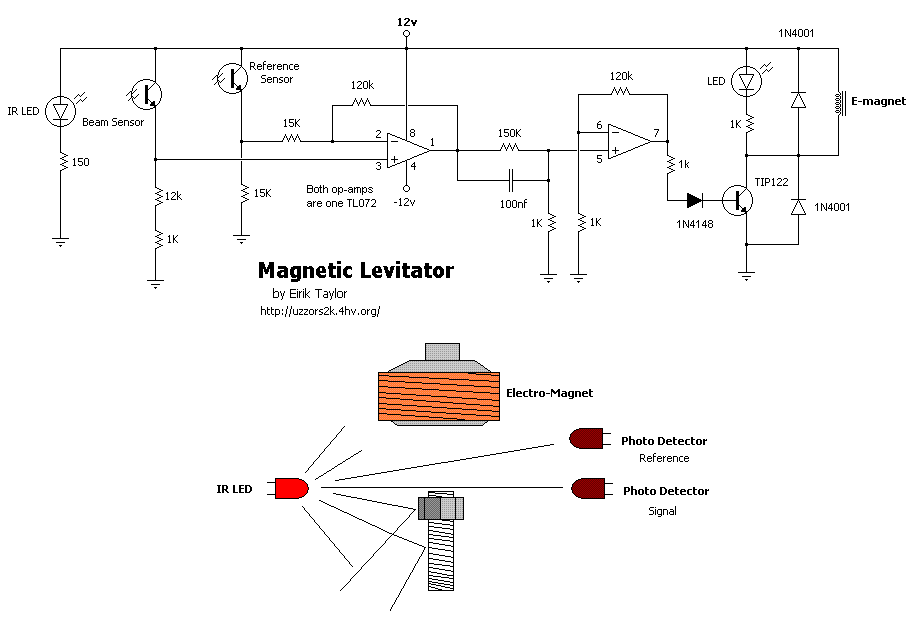
Infrared Magnetic Levitator
This circuit works by comparing the signals from the sensors with the first op-amp and sending out a
voltage proportional to the difference or "error". The error signal is then sent through a
compensation network which acts a high-pass filter, allowing quick
changes in error to pass easier than slow changes. This is required to
stabilize the control loop, and without it objects would just
flutter close to the electromagnet due to the system being unstable.
The signal is then amplified to it's original amplitude, since the compensation network
attenuated it, and finally drives the TIP122 Darlington transistor, which
controls the electromagnet current. The extra diodes around the
transistor are to prevent damage to the transistor. The signal diode
on the base prevents reverse biasing the base, which is damaging, while
the two 1N4001's give a path for the magnetizing current to flow when the
electromagnet turns off. The optical components used aren't too
critical, as long as their wavelengths match up ok, and the
detection/emission angles aren't too narrow. The IR LEDs are TIL38,
which are 940nm peak, have 15 degree spread, 35mW and 100mA max. The
detectors are PT204-6B, which are IR phototransistors.
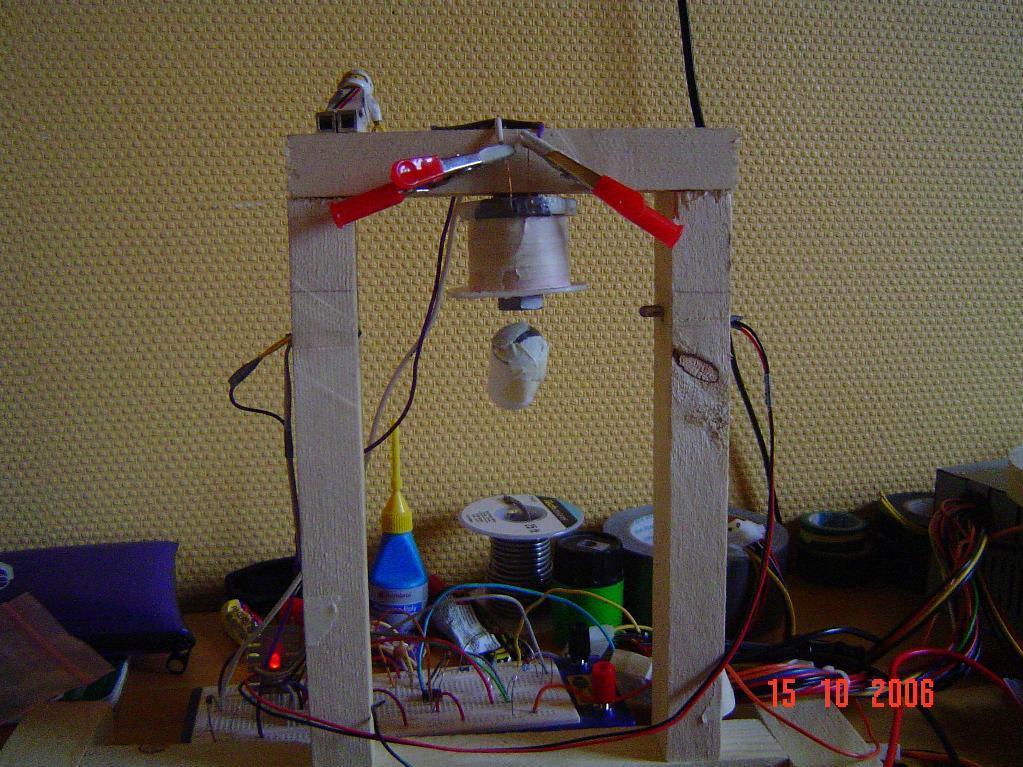
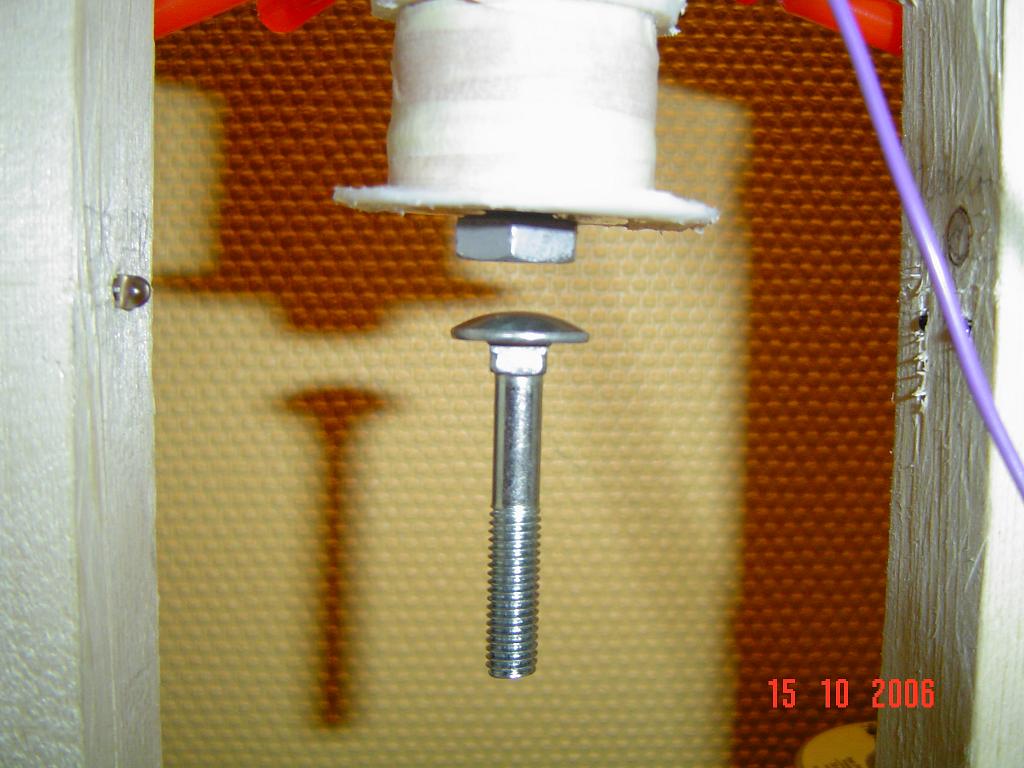
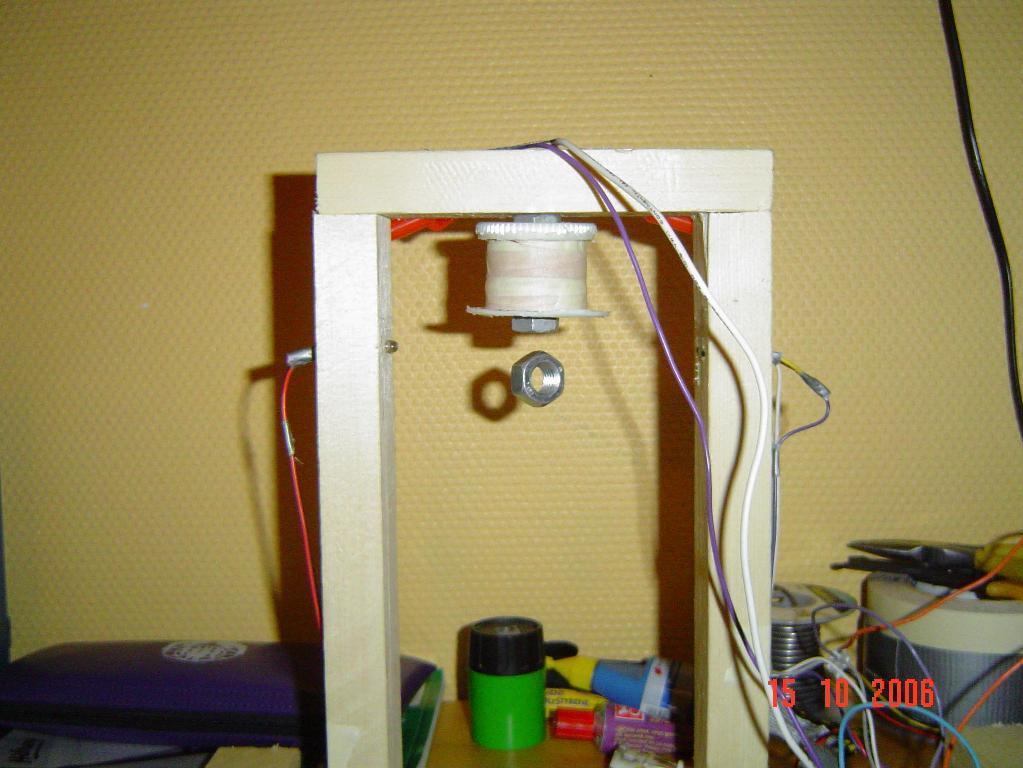
Construction Details
The top detector is a reference detector and the bottom one senses when an
object is in levitating position. The object detector must be level
with the IR LED. The reference detector must see the IR diode at all
times, even when levitating an object. The electromagnet should have maximum
15 ohms of resistance, any more and it will not be able to lift
anything. Too little resistance and the transistor will have problems
regulating electromagnet current and will also dissipate more heat.
When constructing an electromagnet there are two things to remember. Magnetic force is proportional to the number of
turns and current. So when using copper wire the magnetic force is
roughly proportional to the square of the power dissipated in it, for
all practical use. In my coil I used 70 meters of 0.45mm magnet wire.
The coil can be wound on almost any ferrous metal rod if you're not concerned with efficiency. Remember
that keeping the surface area of the face small will keep the
object centered better. Constructing the circuit correctly is easiest if built
in two parts; part 1 with the detectors and first op-amp to
make sure the output swings when an object is put in the beam, and
then part 2 with the rest. This way it will be much easier to
troubleshoot.
Troubleshooting
If the levitator fails to suspend
anything, but objects “flutter”, you will need to
adjust the compensation network. Try changing resistor values and capacitor
values. The compensation network is the 150K, 1K resistor and
100nF cap between op-amp1 and 2. Decreasing the value of the 150K
and/or increasing the value of the 1K will often solve the fluttering
problems. Sometimes fluttering problems are caused by the reference
detector not being setup properly. If the coil doesn’t turn
off even when an object is put in the beam, check the reference and object
detectors.
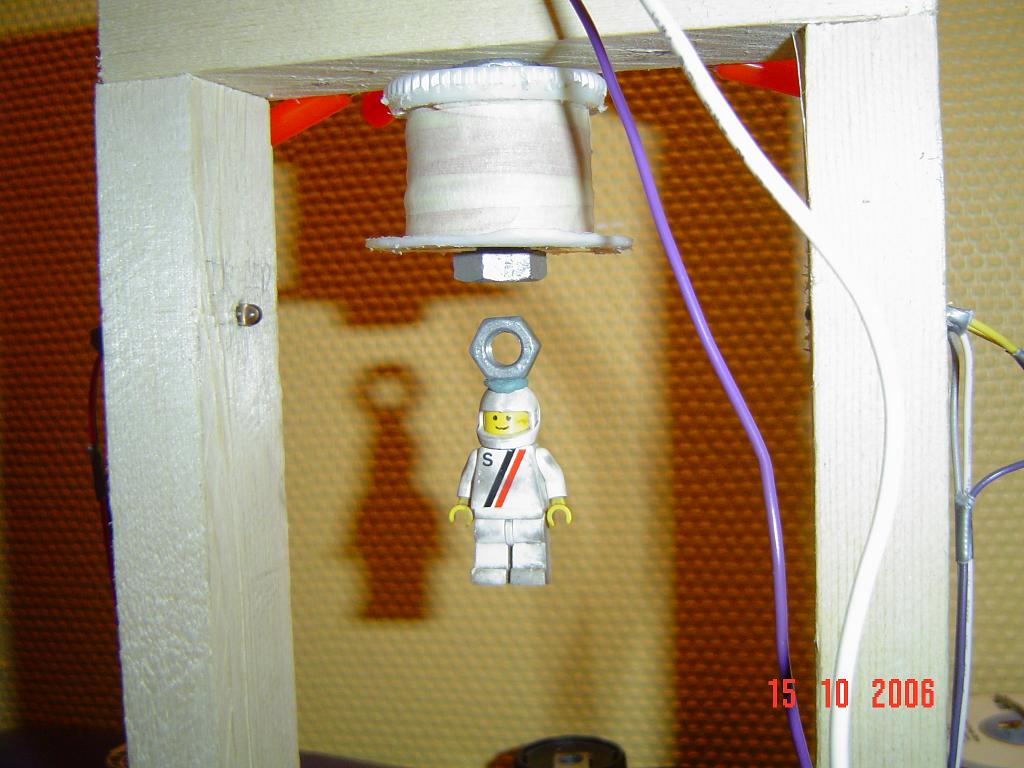
Levitated Objects
I scavenged a small neodymium magnet from a CD-ROM drive, which is quite powerful for it's size.
Using a permanent magnet will increase the force the electromagnet exerts on an object,
and allow for greater distances or heavier objects to be levitated using the same amount of power.
Youtube Video
Hall-Effect Magnetic Levitator
Another method for detecting the levitated
object's position is using hall-effect sensors. These are sensors which
detect the intensity of the magnetic field they are currently in, and
provide an output voltage which is proportional to it. Hall effect
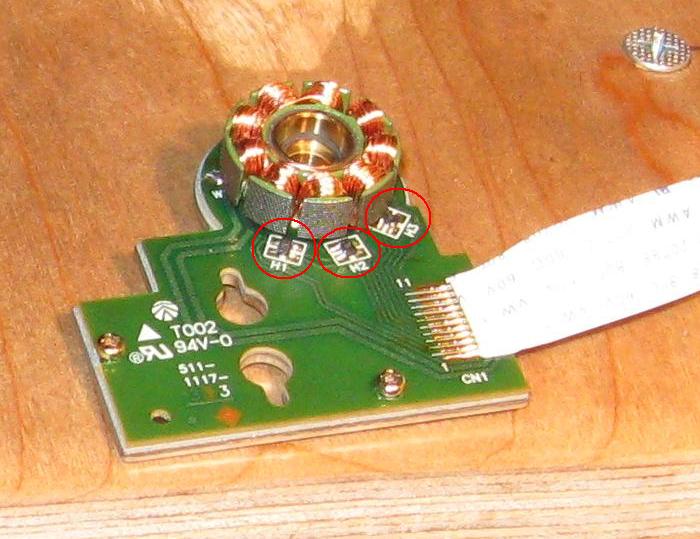
sensors are often used in brushless DC motors to detect the position of the rotor,
and as such can be found in floppy and disk drives. After experimenting
with some hall-effect sensors scavenged from floppy and CD-ROM
drives I found they are usually linear, symmetrical 4-pin devices. Which means
they have no defined polarity and diagonal pins correspond to
input/output and anode/cathode pairs. The sensors I used in the
end were taken from a CD-ROM spindle motor, because the
one I had from a floppy drive had been crushed. Remember to shield the
sensor from objects suddenly being drawn to the electromagnet. I
epoxied a 2mm thick plastic cover over mine to keep the impact force
spread over a larger area. Initially I experimented with a feedback design,
but found I couldn't stabilize the system. Unequal amounts of flux
through the two sensors from the electromagnet and reduced sensitivity
when in a strong magnetic field caused strong hysteresis in the system.
After a throwing the board out the window a few times I finally
accepted the KISS principle.
The voltage between the + and - output of the hall effect sensor can
swing positive and negative, but when referenced to ground one will go
up and the other down (or the opposite, depending on the magnetic
field's polarity). In order to get a useful sensor output the two
voltages are compared and amplified by a differential amplifier. You'll
need to decide which magnetic pole you want as positive, this can be
changed by reversing the sensor leads. Whichever you choose, make sure
the output of the LM358 rises positively to it's approach, or the
levitator will repel the object! The sensor output is
compared to the reference, which is set to some defined error level.
The TL494 will adjust the duty cycle of the electromagnet in order to
keep the sensor output at the correct level. I've added a
bonus feature to use up the other op-amp in the LM358, a temperature
sensor. It's glued to the electromagnet, and will reduce the magnet
current once it gets too warm. Almost unnecessary in this model, as it
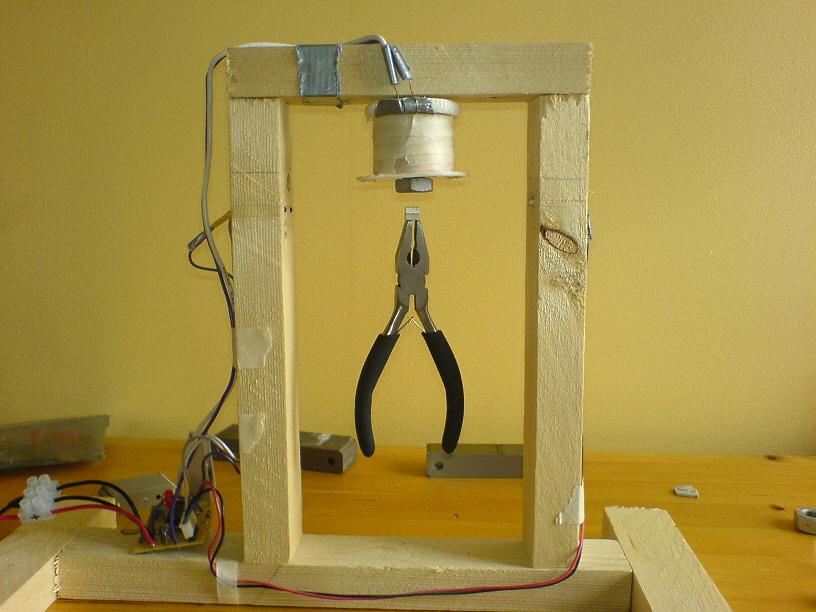
operates very efficiently. You will find maximum power cannot be
achieved with your electromagnet using this circuit. I could levitate
objects at twice the distance using an earlier prototype, see the first
picture below,
but I was unable to stabilize it. I'm unsure as to why it limits power
so much, but it's sufficient for light loads. Some details on the
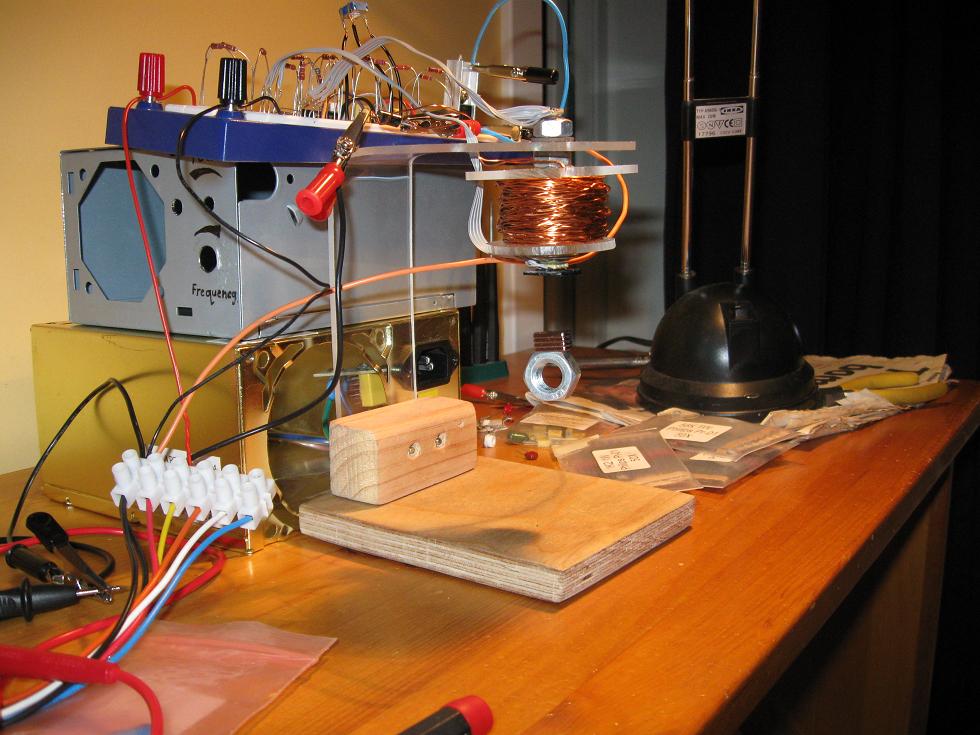
electromagnet: The core is an M8 (8mm in diameter) flat-head carriage
bolt, taken from my junk box. The wire was taken from a PFC inductor,
wire gauge is estimated to be 1mm in diameter. I used all of the wire
available, which might have been 50 meters. The DC resistance of the
electromagnet is 2,4 ohms. The physical dimensions of the electromagnet
are 2,5cm long by 4cm in diameter.
A lot of people have trouble finding these little symmetrical hall-effect sensors, but a standard three-pin
linear hall effect sensor such as the SS495 can be used instead. Due to
the variations in hall effect sensor design and sensitivity certain component values have to be found through
experimentation. Here's an alternate
schematic featuring a three-pin HE sensor.
Disclaimer:
I do not take responsibility for any injury, death, hurt ego, or other
forms of personal damage which may result from recreating these
experiments. Projects are merely presented as a source of inspiration,
and should only be conducted by responsible individuals, or under the
supervision of responsible individuals. It is your own life, so proceed
at your own risk! All projects are for noncommercial use only.

 Another method for detecting the levitated
object's position is using hall-effect sensors. These are sensors which
detect the intensity of the magnetic field they are currently in, and
provide an output voltage which is proportional to it. Hall effect
sensors are often used in brushless DC motors to detect the position of the rotor,
and as such can be found in floppy and disk drives. After experimenting
with some hall-effect sensors scavenged from floppy and CD-ROM
drives I found they are usually linear, symmetrical 4-pin devices. Which means
they have no defined polarity and diagonal pins correspond to
input/output and anode/cathode pairs. The sensors I used in the
end were taken from a CD-ROM spindle motor, because the
one I had from a floppy drive had been crushed. Remember to shield the
sensor from objects suddenly being drawn to the electromagnet. I
epoxied a 2mm thick plastic cover over mine to keep the impact force
spread over a larger area. Initially I experimented with a feedback design,
but found I couldn't stabilize the system. Unequal amounts of flux
through the two sensors from the electromagnet and reduced sensitivity
when in a strong magnetic field caused strong hysteresis in the system.
After a throwing the board out the window a few times I finally
accepted the KISS principle.
Another method for detecting the levitated
object's position is using hall-effect sensors. These are sensors which
detect the intensity of the magnetic field they are currently in, and
provide an output voltage which is proportional to it. Hall effect
sensors are often used in brushless DC motors to detect the position of the rotor,
and as such can be found in floppy and disk drives. After experimenting
with some hall-effect sensors scavenged from floppy and CD-ROM
drives I found they are usually linear, symmetrical 4-pin devices. Which means
they have no defined polarity and diagonal pins correspond to
input/output and anode/cathode pairs. The sensors I used in the
end were taken from a CD-ROM spindle motor, because the
one I had from a floppy drive had been crushed. Remember to shield the
sensor from objects suddenly being drawn to the electromagnet. I
epoxied a 2mm thick plastic cover over mine to keep the impact force
spread over a larger area. Initially I experimented with a feedback design,
but found I couldn't stabilize the system. Unequal amounts of flux
through the two sensors from the electromagnet and reduced sensitivity
when in a strong magnetic field caused strong hysteresis in the system.
After a throwing the board out the window a few times I finally
accepted the KISS principle.

 This work is licensed under a
Creative Commons Attribution-Noncommercial-Share Alike 3.0 Unported License.
This work is licensed under a
Creative Commons Attribution-Noncommercial-Share Alike 3.0 Unported License.